
How to Fully Optimize Images for Your Website
The Importance of Image Optimization for Website Performance
I like to say, “Your photos can make or break your website.” If you thought I was talking about aesthetics, typically, you’d be right. But today I’m talking about the importance of having your images fully optimized for the web, not just aesthetically. Yes, your images are a representation of your brand, but they also play a significant role in your website’s search engine rankings, (SEO) as well as user experience. Without proper optimization, your website may load slower, resulting in a higher bounce rate and lower engagement.
So before you start loading all your photos into the back end of your website, you’ve got some pre-work to do. Trust me, it’s essential. You can’t just dump your images onto your website and call it a day, my friend. Skipping these steps could result in some headaches down the road. But don’t worry, I’m laying out the necessary steps to make sure your images are fully optimized for SEO as well as a good user experience.
Now that you understand the why, let’s get down to the how. There are 5 steps that we’re covering. Let’s get started.
Choosing the Right Image Format
When it comes to choosing the right image file for your website, there are a few factors to consider.
Firstly, you should consider the purpose of the image. Is it a high-resolution photograph, a simple graphic, or an icon? Depending on the type of image, different file formats may be more appropriate.
JPEGS
JPEGs are best for photographs or images with many colors, as they can display high-quality images with a relatively small file size.
PNGS
PNGs, on the other hand, are better for graphics or images with transparency, such as logos or icons.
SVGS
SVGs are also great for logos and icons, as they are scalable vector images that can be resized without losing quality.
Resizing Images for Web
The size of your images depends on how you’ll be using them on the website. Typically you’ll have a combination of both landscape and portrait sizes. I like to use Canva for cropping and resizing my photos. Canva is a free tool (with an option of a premium subscription) This is my affiliate link for Canva.
Banner images
Banner images (the images that extend the full width of your website) should be landscape and between 2000px and 2500px wide
Standard images
Standard images (typical inline images) should be between 500px and 1000px wide
Icons
Icons should be approximately 150px wide
Compressing Images For the Web Without Losing Quality
In addition to file format, it’s also important to consider the image’s file size. Larger file sizes can slow down your website’s loading speed, so it’s important to compress your images without sacrificing quality. There are many free online tools available to help with image compression for your website.
TinyPNG is my go-to, it reduces the number of colors in the image while still maintaining its visual quality. With TinyPNG, you can compress up to 20 images at a time with a maximum file size of 5MB per image.
Most web platforms recommend each image be less than 500KB. I like to shoot for somewhere between 250KB and 350KB. You’ll want to keep the total page size less than 5MB. This means if you’re photo heavy on a particular page (think a photographer’s portfolio page) then you’ll definitely want to get those file sizes as small as possible without losing any photo quality.

Image Compression Plugins for your Website
- Smush: This is a widely used plugin that automatically optimizes your images upon upload, as well as compresses and resizes your existing images. Smush also includes a feature that lets you compress up to 50 images at a time.
- ShortPixel: This plugin offers lossless and lossy compression options, as well as the ability to convert images to WebP format for even faster loading times. ShortPixel can also optimize PDFs and other document types.
- Imagify: This plugin offers three levels of compression, including an “Ultra” option that can significantly reduce image file sizes. Imagify also includes a backup feature that lets you restore your original images if needed.
Keep in mind that while image compression plugins can be a great tool for reducing the file size of your images, they should not be relied upon as the sole method of image optimization. Don’t think that you’ll be able to upload a 5MB photo and get away with it just because you have a compression plug-in on your site.
Naming Your Image Files
Do the images on your website have a filename that looks like this: “IMG_1234.jpg”
Naming your images properly is an important aspect of optimizing images for the web. By using descriptive, relevant names for your images, you can not only improve the user experience but also boost your website’s SEO. When naming your images, it’s important to use keywords that accurately describe the content of the image, as this will help search engines understand the context of the image and improve its visibility in search results.
Here are some things to keep in mind when naming image files:
Use dashes to separate words. Keep the image names fairly short, yet descriptive. Add a keyword or keyword phrase where it makes sense, but Beware of keyword stuffing.
The Importance of Alt Tags (and How to use them)
An alt tag is used to describe the content of an image on a website. Alt tags are important for several reasons, including improving website accessibility for visually impaired users and providing additional information to search engines about the content of an image. Alt tags also help prevent images from appearing broken or missing if the image fails to load for some reason.
When writing alt tags, it’s important to be descriptive and accurate in your descriptions. Avoid using generic terms like “image” or “photo” and instead use specific, relevant keywords that describe the content of the image.
It’s also important to keep alt tags concise and to the point. Additionally, avoid stuffing alt tags with too many keywords, as this can be seen as spammy by search engines and can harm your website’s SEO.
When an image is purely for design purposes, an alt tag is not needed.
You’ll want to keep alt text to 140 characters or less.
Adding alt tags in WordPress
In the media library of your WordPress dashboard, you’ll have the option to add alt text once a photo is selected. You can also add a caption and a description, although those are less important for SEO.

Adding alt tags in Showit
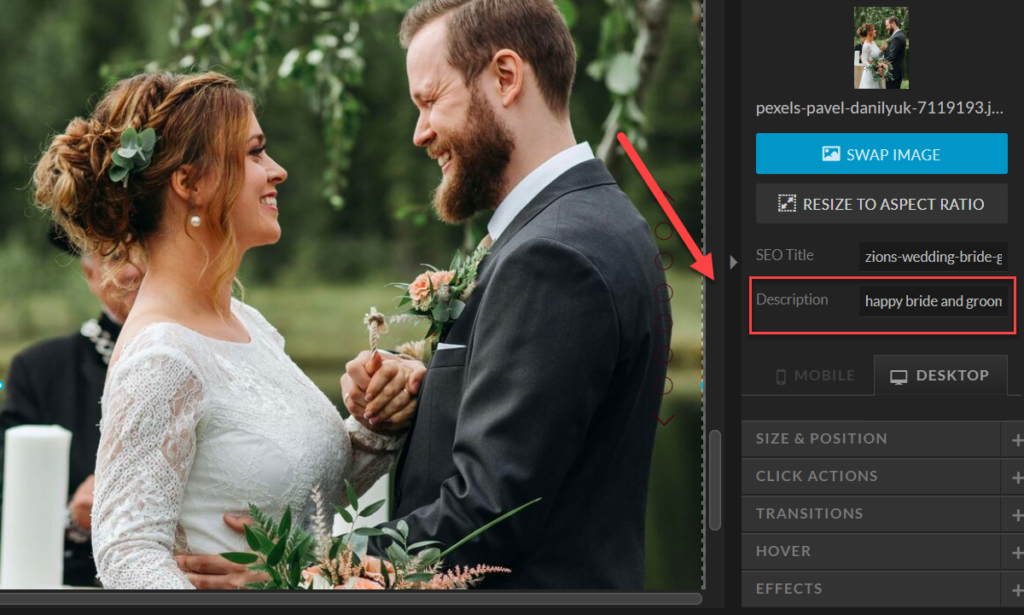
To add alt text to an image in Showit, go to image settings, and then Description. The SEO description will provide the alt text. This is different than the SEO title. Google recommends not using the same title for the SEO title as the SEO description. Think of the SEO title more like an image file name. Here I have named the SEO Title “zions-wedding-bride-groom-smiling” and the alt tag “happy bride and groom in their wedding attire smiling and facing each other”
Adding alt tags in Squarespace
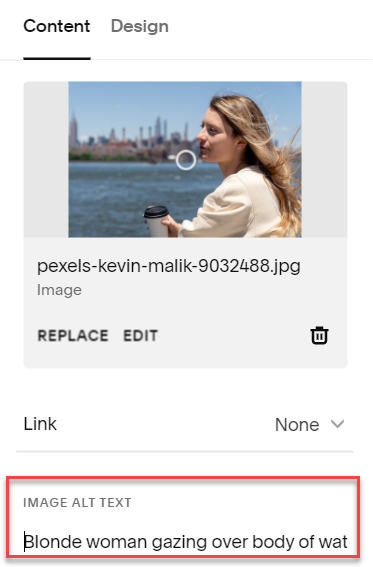
When you’re adding/editing a photo in Squarespace, the alt text is under the “content” tab of that image.
Final Thoughts
That’s a wrap! By following the steps I’ve shared in this post, you can make sure your images are fully optimized for your website. That means your visitors will have a better experience, and your SEO rankings will improve. Just to recap, here are the steps needed to fully optimize your images:
- Choose the right format
- Resize your images
- Compress your images
- Name your images correctly
- Add alt text.
These steps may seem tedious, but remember, small changes can make big impacts, and optimizing your images is one of the easiest and most effective ways to enhance your website’s performance.
